 He's quite a handsome chap with a funky hairdo, just like Penny.
 The studio started life as a wooden box that I covered with Tim Holtz papers. I sanded all the edges and added some paint with an Espresso paint dabber followed by some black to give it a distressed/worn look.
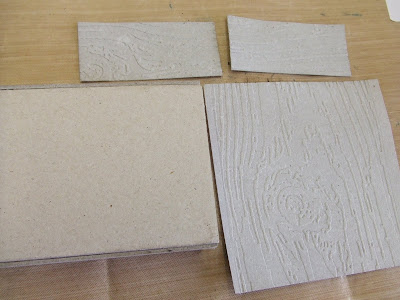
  I made Bob's work bench by making a box from greyboard to begin with and the covered it with Tim's Grungepaper. To make it look more realistic, I popped all the Grungepaper panels through Tim's woodgrain embossing folder.
Coloured it with some Crushed Olive and Brushed Corduroy Distress ink, applying it with a blending tool to get even coverage.

Then, with a dry brush, I worked tiny amounts of Espresso paint between the grain of the wood and when dry, covered the greyboard box with the panels and added some painted cotton reels for legs for the workbench.

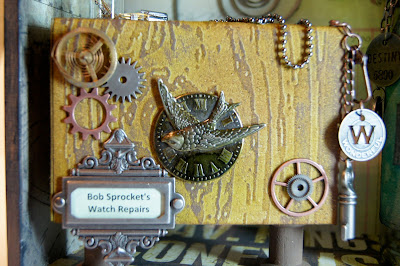
The hanging sign was made from copper metal and die cut using Tim's Hanging Sign die by Sizzix. I'm sure you are sick of hearing about the tape sandwich but for those of you new followers, a tape sandwich really helps to die cut the metal with ease, it will give the metal some stability. Simply apply Humungo sticky tape to a piece of cardstock and then stick the metal to the other side of the Humungo, you are now ready to die cut. Simply place the metal facing the die before cutting in your die cutting machine.
 I decided to decorate the hanging bracket with my TSS pointy tool.
After putting the hanging sign through the Big Shot in another embossing folder, I neatened off the edges with an embossing wheel.
 I covered the whole thing with black paint dabber.
 Then used a paper towel to remove the excess paint to reveal an antiqued look.
 I then took one of Tim's clocks from his Timepieces Ideaology set and coloured it with Pesto alcohol ink. To make the numbers really pop, I sanded back through the alcohol ink to reveal shiny numbers. This clock together with the wings below became part of the hanging sign that you will see in some of the photos later in this post. I got so carried away with creating, I forgot to keep taking pictures.......one of my regular downfalls I'm afraid!!!!
 I die cut the wings from Tim's Grungepaper, coloured them with Crushed Olive Distress ink and then sprayed them with Rangers new Perfect Pearl Copper Mist......yum, yum!!
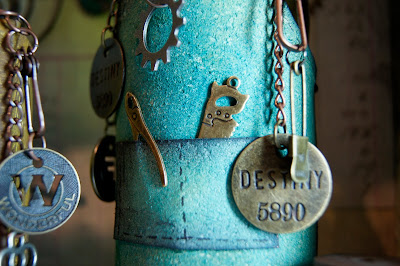
 Sadly as mentioned before, I'm not so good with the continuity of pictures but basically I went on to decorate the studio with lots of ideaology embellishments and made Bob from an empty bottle. Bob started life as a lemonade bottle....just like penny. It is important to thoroughly wash and thoroughly dry your bottle before working with it. I coloured the bottle with alcohol ink and made Bob a fun little apron out of Grungepaper. He's got Grungepaper hair and a lot of chains for jewellery.


37 comments:
Lin, this is totally, totally stunning! Your imagination is incredible, and then you put it into practice and it comes out so wonderfully.
great stuff Lin, as always you inspire!
Fabulicious!! Love it :)
xoxo Sioux
Very inspirational project - I love it :)
Wow, stunning, absolutely amazing. love it.
I am at a loss for words ... LOVE LOVE LOVE Penny ... but I think I LOVE LOVE LOVE LOVE Bob more ... now they are together ... can they come live with me??? Huh??? Can they???
That is totally awesome!
Now this is just too cool! LOVE it!
Linda
This is a wonderful whimsy piece. What fun!
Lin, you must of had great fun creating this. I absolutely love it, especially all the wonderful little details.
Oh yes that's the ticket - just lovely - super - fab - I can't wait to visit to see himin real life - i am near Olney in a couple of weekends - might drop in so see him _
now despite insomnia and the lure ofthe iMAc I must at least Try to get Some Sleep.
oh and I've seen fab projects from the AC weekends all over woyww...
Dx
I am officially BLOWN AWAY... this is just STUNNING and well.. COOL!! I can't wait to see your store... I'll be there in...hmmm. doing math... 24 days!!! Hels will bring me to see you! WOOHOO! Maybe I'll get to meet Bob in person!!! I'm with Linda... there really are no words good enough to describe how much I love this! AWESOME! ~ ellen (*big smile*)
What a great project! There's so much going on that you'll see something new every time. Thanks for sharing. I especially liked the metal sign.
Wow that is seriously amazin', hope to get a closer peek tomorrow at the class.....looking forward to it
hugs
Bob is fantastic! as always inspirational work....
This is absolutely fabulous. Love all the details.
WOW !!!! Absoloutely stunning ! All that detail is amazing,every time I have another look I see something different. I'm at your shop Friday so hope to see him in real life.
linda you have done it again,
wow how fab is bob,
the whole thing is totally amazing,
but you know that right1!!!,
I loved penny, but I think bobs my favorite,
Can't wait to see the rest of the clan,
you know they need a kid or 2,or maybe a grate uncle farthing back from a ten year explore in the deep dark jungle.
fab work lin,
Kat.
All I can say is WOW! What a lovely piece of inspiration Bob is. I want to go create my own little room with a view for myself.
Wow!!! This is amazing!!!!
Stunning piece, great imagination, a very unique design and I love all the little touches, the case, the name, the hair, outfit etc etc. Fabulous piece. Tracy Evans x
Oh look at Bob, isn't he just a dandy! Loving seeing his home coming to life Lin, thanks for sharing your process and all the tips and hints you give too x
Thanks so very much for this; I love what you did with the metal!!!!
So pleased to have made Bob's acquaintance at last. He is everything and more that we expect of you Lin!!! Penny certainly has a real catch in Bob. Hoping you're going to continue with just a few more characters. Can I be bold and make a request for the MOTHER_IN_LAW please?
Thankks Lin
ive been on my training course too long, when I saw the hanging B & S, I though B*llS***, random i know, Ive now recovered and worked out its Bobs initials, oh and your piece is fabulous with a capital F :)
This is sooo greate!! I love Bob and his "home" ;-)
You are so creative and talented. I'll bet you made Bob that way, too. I have a beloved watch I need him to fix!
WOW. this is jaw droppingly fantastic!!!
Oh wow, how amazing is this, absolutely brilliant
C
xx
Bob Sprocket and his shop is amazing!! thanks for sharing.
RobinG
Oh, my...love it! The embossing is so effective. I have seen the plates but seeing it in action is amazing!
Suz
http://katsujewelry.blogspot.com
Oh Lin - this is fabulous. I bet you got as much pleasure from putting it all together as we are all having looking at it. Hope Penny is grateful!
What fun!
Cute, funny, beautiful, resourful and inspiring! thanks!
Wow, simply AMAZING! I am totally in love with your creativity and what you did with the hanging sign TH die! Insanely cool looking!
Very AWESOME!!!! THanks for sharing!!!!
Wow, Bob is a lucky man to have such a great studio to work in.
Post a Comment