
I'm so sorry I have been AWOL for over a week. Unpacking, recovering and re-ordering after Ally Pally was a major task....you guys certainly know how to shop and for that I am truly grateful!!!!
And now we are on the countdown to Artsycrafts, so it's lots of cutting of metal and kitting up for Karen. Lots of ordering, chasing orders, organising of equipment, fine tuning all the colour combinations and making of 100 name badges for me.......yes I did say 100 hand made name badges!!!! Lots of pressing rubber and creating class notes for Leandra. Both Leandra and I also have to teach all the projects to the fantastic Artsycrafts helpers.....that would be Karen, Lynne Howe, Linda Elbourne and Jo Firth-Young all of this needs to be done in two weeks. This is in addition to normal everyday running of L.B.Crafts and Paperartsy, so not a lot of sleepoing going on at the moment.
So here I am in the shop trying to make name badges between answering the phone, unpacking boxes and serving customers when I decided that I needed to take a break from the repitition and thought I would show you how to make some very cool metal embellies with the new Paperartsy dies. These have been designed by Leandra to die cut paper, card, metal or acetate and then you can stamp the matching image directly on the top......I'm lovin' it! no more hand cutting of fiddly dragonflies for me or for you! I didn't have my stamps in the shop with me so I've decorated the die cuts in other ways.....hope you like it as much as I do....let me know what you think. All the dies and stamps are on the website.....that's a miracle in itself!
First of all, you need to make a tape sandwich. Cut a piece of cardstock, a piece of humungo sticky tape and a piece of metal all the same size and big enough to fit your chosen die.

Stick all three layers together starting with the card and humungo, followed by the metal. It is easier to remove the second paper liner from the humungo when it is stick on the card and not the metal. Place the metal facing up in your Big Shot or Cuttlebug, die facing down and run through the machine slowly. You are cutting through three layers here so slow is good. I also run it back through the machine just to make sure it has cut through everything. In this sample, I used the new Gold Nugget metal.

When it comes out of the machine it has this cute little raised up section in the centre which I like to use and embellish but if you want the metal to be completely flat so that you can stamp on it, simply run it through your machine again between the two clear plates. N.B. MAKE SURE THAT YOU DO NOT HAVE THE SCRATCHED SIDE OF AN ACRYLIC PLATE FACING THE MATAL....THE MARK WILL TRANSFER!!
Taker a brass brush and scrub away the gold paint from the centre section on the die cut moth.
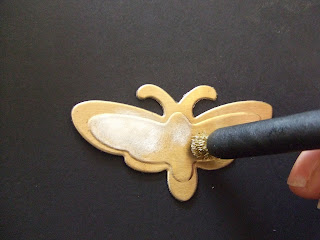
Next, use an embossing wheel to decorate he edges.

I used my pointy tool to add dimples to add to the decoration.

I did stamp "take flight" on this one later with Stazon, which I am liking A LOT!!!

Next up, the open dragonfly. Repeat the whole tape sandwich thingy and cut in the Big Shot as before.

How cool is this?

I repeated the brass brushing thing and used my pointy tool again to do the "scribbly, scribbly thing" which is basically doodling!

Select an embossing wheel to decorate the edges.

Use the pointy tool to add some dots down the body of the dragonfly.
 Now I am going to use some of the new Inka Gold colours....just scrumptious!
 Just add a touch of paint with you finger. This stuff dries instantly so if you need a bit of time to spread it around, just use a wet finger. I am so in love with this product.


 This is how he looks when he comes out of the Big Shot.
 Pop him in your favourite embossing folder. I can't wait to try him in some of Tim's new dies....I'll let you know when we have them in stock.
 He comes out all scripty and arty.
 Now to grunge him up a tad! I've got some Pesto alcohol ink on my applicator tool. Pesto is my all time fav.
 Gently swipe the tool over the embossed bird. The alcohol ink will start to remove the paint and also tint the aluminium underneath. Don't press too hard, it will remove all the paint so you are really just tickling the surface of the metal here.
 Here's my trio of all things flighty....hope you like them.


Here's aclose up so you can see how gorgeous they are. (They are in stock and should be on the website by the end of the week.....if you can't wait til then, call Karen in the shop on 01234 714848)
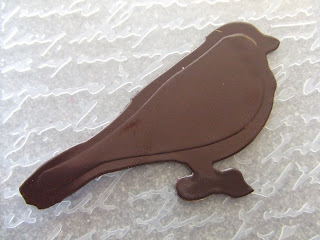
Now for the birdie guy. This time my tape sandwich is with Dark Chocolate metal.
This is how he looks when he comes out of the Big Shot. Pop him in your favourite embossing folder. I can't wait to try him in some of Tim's new dies....I'll let you know when we have them in stock.Enjoy. Lin x


24 comments:
totally and loving the walk through - thanks for sharing
Hi, I love these ideas. We were playing with the new stamps and die cuts last night at my craft group in Sheffield and I had to make some purchases! love the alcohol ink technique.
I like them a lot :0)
Great post - love the birdies especially. Thanks for taking the time to share.
They are just fab! At the moment I can't bear to use my cuttlebug to die cut cos I don't want to get the acrylic scratched, but if it doesn't hurt anything, then I have to have some of these dies..... I especially love what you did with the bird.
Thanks for taking the time out to show these fabulous embellishments.
Only just over 2 weeks until Artsycrafts weekend, really looking forward to see the projects that you have lined up for us. :o)
Absolutely love these, and loved the step-by-step too. Can't wait until Artsycraft...
Oooooooohhhhhhh you temptress, you! I think I may need those dies now. I love what you've done with the dragonfly.
Too cool! I love running stuff through the Cuttlebug...so easy to do.
Got to get some of those Viva paints!
Linda
Brilliant idea Lin thanks for the tutorial.
x Michelle
I so enjoyed watching you do that gorgeous dragonfly at Ally Pally but didn't buy the dies or the Colour Soft then as I had already spent a small fortune on some fabulous metal, stamps and some Viva Terra colours.
However, my three crafting buddies and I have a visit to the shop planned at the beginning of June - I feel a mega spend coming on, Lol! That gorgeous stuff you keep rubbing into the metal is at the top of my list. Can you cope with four over excited crafters in the shop, Ha! Ha!
Lesley Xx
love the dies and what you have done with them
My fav is the Dragonfly but their all gorgeous. Thank you for sharing!!
xx
what great embellies these will make just lovin the dragonfly I sleep to go till the next class hugs from Daniele
Ooh I like this idea - more spending I am afraid.
Love what you did with the dies Lin, thanks so much for taking the time to show and tell. Looking forward so much to the AC weekend. xxx
Hi Linda , 1st try to leave comment
Looks as good as your demoed yesterday in class.
Love your artwork, all of it. Tracy x x
HI. Linda Elbourne http://acraftingjourney.blogspot.com/ left a message on my blog recommending you. I wass asking for advice on decorating Style Stones, which i've just bought for the first time. I'm not a stamp fanatic so I don' have heaps of inks. Do you have any tips for a beginner?
FAB!!!! Looks like more necessary purchases are looming!!!
xxx
lovely work asusual,brill dragonfly, must try something similar
janet
Hi Linda congratulation Two of my favorite artist You and Tim.
I think yiy should do your on Compendium, if you get the time.
Love Love the work you have prepared
well done
Sabrina
I learn so much from you! Thankyou for sharing your talent!!!
Hugs xx
loving the walk through thank you
Post a Comment