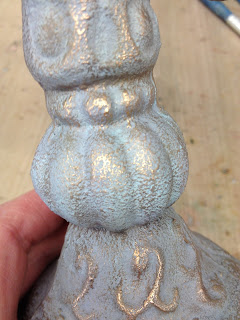
Now that I can do manage a paintbrush, I can fill my time more productively so I spent my afternoon decorating this baby. I got it from the lovely farm shop right next to The Craft Barn, it was such a bargain....£2.50!!!!! I do actually quite like it as is but you know me, if it can be painted, I'll paint it!!
All the paints I used are PaperArtsy Fresco Finish paints and I started by painting a base coat of Little Black Dress as I wanted a nice even coloured base to build up layers of colour on. This was just like using black gesso.
I thought it might be quite nice to see if I could use a bit of the Crackle Glaze on this door stop. I knew in my heart of hearts that it wouldn't be a sensible idea to use the glaze over the whole thing as the are so many tight corners and nook & crannies, painting the top coat on would be a challenge so I opted to glaze some of the smoother, straight and flat areas instead. I normally use a palette knife to apply glaze as you really only need a very thin layer of it but of course, this was such an intricate shape, I decided to simply use my finger.
Once the layer of glaze was completely dry, it was time to think about colours for the next layer. I decided to go with Elephant and Mermaid (both opaque ) and I started to paint all the areas without Crackle Glaze, blending the two colours together.
Then painting over the Crackle Glaze....it worked like a dream. This stuff is just amazing, in the past I've used it on paper, card, aluminium, wood, fabric and it always delivers fabulous results. How cool is this????
Now to make it more interesting. I started dry brushing with Mud Splat, using quite a stiff brush and working the paint slowly into all the little crevices. You really have to be patient with dry brushing....less is definitely more. At this point, I had to rest the arm for a couple of hours but this also gave me a bit of thinking time as I wasn't sure what colour to use next.
I decided to keep it simple and go just a shade darker and found that French Roast was the perfect colour choice for the next layer.
And the finishing touches.....Renaissance Treasure Gold.
It was quite tricky to photograph the completed piece in a way that shows off all the layering so I took it
outside in the daylight.....I never knew we had so much clover in our lawn!!!!!


15 comments:
wow! amazing bargain to start with but you did wonders with it. Really impressed with the crackling.
What a transformation!! I love that the crackle worked on such a piece - who knew!! Glad you've had your stitches out, you'll be coming on leaps and bounds now!
Blimey you are good.
That's gorgeous! xxx
Gorgeous! What will you do with it?
Lovely paint job!
Sally
what good news Lin..stitches out!! and making good progress..brilliant news..and on top of all that you got yourself a real bargain!! Love what you have done with it and the colours are perfect!!
I liked it as it was but love what you've done with it - a stunning transformation
Ooh love it!!
Oh what a lovely transformation and treasure gold is amazing and gives the piece a fantastic finish.
A fabulous piece now you have shabbied it up, love it. Good luck with the exercises and take care.
hugs {brenda} x0x
Lovely work Lin. Now that's what I call physio therapy. Glad you are feeling better.
ooooh, what a fabulous piece of altered paint work Lin. glad to hear you're on the mend (and enjoying yourself!)
Excellent effects you've achieved. It looks very professional and quite "chic".
Hope you are getting better each day...
Jo x
Loving it glad you're on the mend :)
Happy craftin
Rebecca
Post a Comment