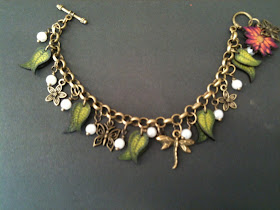
When the lovely Ryn Tananka from Designs By Ryn sent me some of her wonderful stamps to play with, I chose all floral designs which is a little bit unusual for me as I normally opt for stuff that is a bit on the quirky side!! Anyways, today I thought I'd share a shrink plastic bracelet that I made using her Three Leaf Set SKU CM-F5
I used frosted Shrink Plastic for this project, this brand has a rough side and a smooth side. Normally I use Lucky Squirrel shrink plastic as this shrinks evenly in both directions. Sadly, I had used all my Lucky Squirrel stuff (note to self....MUST BUY MORE) and used what ever was available. If you are using one that is smooth on both sides, you may need to gently sand the surface a little to help you with the colouring of the leaves.
1. Measure some chain around your wrist and calculate how many leaves you will need. I used 5 large and 5 of the medium size.
2.Stamp the images on the rough side of the plastic using Stazon ink. I stamped a few extra designs just in case!
3.I used my Prismacolor colouring pencils to colour the images. These are lovely and waxy, they blend beautifully and are my all time favourite pencils. I started by using a lime colour in the centre on the leaves followed by a darker shade of green around the edges and blended the two colours together with a yellowy/orange over the top.
4. Now you need to cut them out and punch a hole in them all before shrinking. I used an 1/8" size hole, this shrinks down too and will be the perfect size to add jump rings.
5. I always use a heat gun to shrink my shrink plastic. It can be tricky as everything wants to fly off the table so I always use a wooden coffee stirrer and lay it gently across the plastic (don't dig the stick into the plastic as this will make a dimple that will not go away!! The alternative is to bake them in the oven all together. I suggest you following the manufacturer's instructions on the packet as every brand seems to vary slightly. Look how much they shrink!!
6. You will also notice that the colour becomes more intense when the plastic has shrunk. Once they have cooled down, I like to use a black Sharpie marker to colour the edges.
7. Now it's just a case of raiding your stash to find other little trinkets that would look cute mixed in between your leaves. Everything will need a jump ring added to it so that you can attach it easily to your bracelet.
8. I decided to use one of my extra flowers as an added dangle to the clasp on my bracelet.
I hope this inspires you enough to have a little dabble. and of course you can hop on over to Ryn's place to check out her stamps.


That is areally beautiful piece Lin
ReplyDeleteSo beautiful! I have a block with shrink plastic, it never seems to go right, but your tip about the coffee stirrer across them may be the key! Useful things, coffee stirrers - never use them for coffee though!
ReplyDeleteThat is gorgeous ...and clever. I have just had a catch up on your last post ....really enjoyed it ...and learnt a lot ...thanks ...all your pieces were amazing.
ReplyDeleteGorgeous bracelet ! I love Ryn's 3 Leaf Set, they have great movement and shrinking them into charms is brilliant. Love your work ! Shirleyx
ReplyDeleteThat's lovely!
ReplyDeleteNow that is just beautiful, what a great idea! I love Ryn's stamps, I just need more!
ReplyDeleteOh Lin - I just love the surprise I always get when reading your blog! Your ideas are always so varied and clever! I received a huge tin of prisma coloured pencils from the staff when i retired. Still learning - but loving the results! Love the way you blended the colours for the leaves!
ReplyDeleteOh my gosh! This bracelet is truly awesome! Just beautiful. I may have to try it. I already know mine won't come out even nearly as beautiful. Thanks for generously sharing this technique.
ReplyDeleteGorgeous charm braclet, I haven't used shrink plastic for ages. I love visiting your blog, you always have such great ideas. The desciptions and photos are great too. Thanks for the inspiration.
ReplyDeleteFabulous bracelet!!!
ReplyDeleteWhat a gorgeous project, I'd wear it
ReplyDelete